If you want a warm, gooey dessert right now, Easy Chocolate Lava Mug Cake is the move. It’s the kind of single-serve treat that feels like a restaurant lava cake, but it happens in a mug and a microwave, with pantry staples and almost no cleanup.
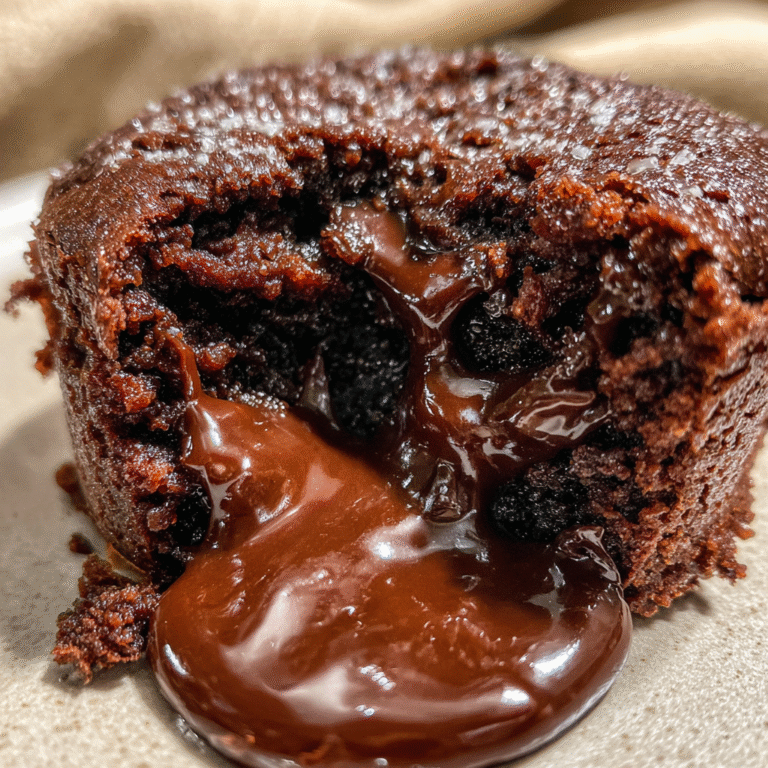
The best part is that molten center: glossy, thick, and chocolate-forward, pooling into the crumb when you crack the top with a spoon. You get a tender cake around the edges and a rich, fudge-like “lava” that tastes like brownie batter’s grown-up cousin.
Why This Recipe Works Every Time
- Flavor: Cocoa plus a hit of espresso (optional) deepens the chocolate without tasting like coffee
- Texture: A short cook keeps the center molten while the edges set like cake
- Time: Mix in 2 minutes, microwave in about 1 minute, eat immediately
- Budget: Pantry staples only—no specialty chocolate required
- Beginner-friendly: One mug, one fork, no mixer, no fuss
- Meal prep (yes, dessert prep): Pre-mix dry ingredients in jars for instant mug-cake “kits”
What You’ll Need
Core Ingredients
- All-purpose flour: Structure for that cake-like edge
- Granulated sugar: Sweetness and moisture
- Unsweetened cocoa powder: The main chocolate flavor (natural or Dutch-process both work)
- Baking powder: Lift, so it doesn’t turn dense
- Salt: Makes the chocolate taste louder
- Milk: Hydrates the batter (dairy or plant-based)
- Neutral oil or melted butter: Moisture and tenderness
- Vanilla extract: Rounds out the cocoa flavor
Flavor Boosters
- Chocolate chips or chopped chocolate: The molten heart
- Espresso powder (optional): 1/8–1/4 teaspoon for deeper cocoa flavor
- Cinnamon (optional): A tiny pinch makes it taste “bakery”
- Brown sugar (optional swap): Adds caramel depth and extra gooeyness
Smart Swaps & Add-Ins
- Flour: Use a 1:1 gluten-free blend for a similar texture (cook times may vary slightly)
- Milk: Oat milk makes it extra creamy; almond milk keeps it lighter
- Oil vs butter: Oil stays moister longer; butter gives richer flavor
- Mix-ins: Mini marshmallows, peanut butter chips, crushed cookies, chopped nuts
- Toppings: Ice cream, whipped cream, berries, flaky salt, powdered sugar
Step-by-Step: From Prep to Plate
The Mug Matters
Choose a microwave-safe mug that holds 12–16 ounces. The batter will puff as it cooks, and you want headroom to avoid overflow.
- Mix the dry ingredients in the mug.
Add flour, sugar, cocoa powder, baking powder, and salt. Stir thoroughly with a fork until the cocoa is evenly distributed. (This prevents bitter cocoa pockets.) - Add the wet ingredients.
Pour in milk, oil (or melted butter), and vanilla. Stir until you have a smooth batter. Scrape the bottom corners of the mug—dry flour likes to hide there. - Create the lava center.
Push 1–2 tablespoons chocolate chips (or a chunk of chocolate) into the center of the batter. Don’t stir them in completely; you want a concentrated melt zone. - Microwave in short bursts.
Microwave on high for 45 seconds first. Check the top: it should look mostly set around the edges but still glossy in the middle.
Microwave another 10–20 seconds as needed. - Rest for 1 minute.
This is not optional. The cake finishes setting from residual heat, and the lava becomes thick and spoonable rather than watery-hot. - Finish and eat while warm.
Add a scoop of vanilla ice cream, a dusting of powdered sugar, or a pinch of flaky salt. Then dig in, aiming for the center.
Quick Visual Cues
- Edges: Set and slightly pulling from the mug
- Top: Matte around the rim, still slightly glossy in the center
- Center: Soft when lightly tapped with a spoon
- Smell: Deep chocolate aroma, not “raw flour”
Pro Tips From a “Made-This-Too-Many-Times” Cook
- Stir the dry ingredients really well. Cocoa clumps are the #1 reason mug cakes taste uneven.
- Don’t overcook. A lava mug cake is about timing. You want “barely done,” not fully set.
- Microwave power varies. If yours is strong (1000W+), you may only need 55–65 seconds total.
- Chocolate chunk > chips for the center if you want a truly molten pool. A square of a chocolate bar melts like a dream.
- Add a pinch of salt on top right after cooking. It sharpens the chocolate and makes it taste more “dessert shop.”
Serving Ideas That Make It Feel New
- Ice cream + hot cake: The classic contrast—cold cream melting into warm lava.
- Berry jam swirl: Spoon a little raspberry or cherry jam on top before eating.
- Peanut butter drizzle: Warm a teaspoon of peanut butter and drizzle over the top.
- Cookie crumble: Crush a chocolate sandwich cookie and sprinkle over for crunch.
- Mocha vibe: Add a few drops of coffee or a pinch of espresso powder and top with whipped cream.
Variations You’ll Actually Want to Try
1) Healthier(ish) Chocolate Lava Mug Cake
- Swap half the sugar for coconut sugar.
- Use oat milk and a light olive oil.
- Add 1 teaspoon ground flax for a slightly heartier crumb.
2) High-Protein Lava Mug Cake
- Add 1 tablespoon unflavored or chocolate protein powder.
- Use milk or a higher-protein dairy option.
- Add an extra teaspoon of milk if the batter looks thick.
3) Vegan Chocolate Lava Mug Cake
- Use plant milk and neutral oil.
- Make sure your chocolate chips are dairy-free.
- Double-check your sugar if you’re strict about processing.
4) Spicy Dark Chocolate Lava Mug Cake
- Add a pinch of cayenne (start tiny) and cinnamon.
- Use dark chocolate in the center.
- Finish with flaky salt for a sweet-heat contrast.
5) Kid-Friendly “Hot Chocolate” Lava Mug Cake
- Use milk chocolate chips for the lava.
- Add mini marshmallows on top during the last 10 seconds.
- Skip espresso powder and keep it classic.
6) Peanut Butter Lava Core
- Press 1 teaspoon peanut butter into the center with the chocolate.
- The result: gooey chocolate with a nutty ribbon.
Storage, Reheating, and Make-Ahead Game Plan
This dessert is best eaten fresh, but you can make it work:
- Best approach: Eat immediately for the molten center.
- If you must store: Cover the mug and refrigerate up to 24 hours. The lava will firm up.
- Reheat: Microwave 10–15 seconds to warm through. It won’t be as molten, but it’ll be cozy.
- Make-ahead kits: Pre-mix dry ingredients (minus chocolate chips) in small jars or bags. When ready, add milk, oil, vanilla, and chocolate, then microwave.
Troubleshooting: Common Mistakes and Easy Fixes
- It overflowed.
Your mug was too small or too full. Use a 12–16 oz mug and stop at the 2/3 full mark. - It turned rubbery.
Overcooked. Next time reduce time and cook in 10-second bursts. - The center isn’t lava.
Add more chocolate in the middle or cook a little less. Also, let it rest 1 minute. - Tastes bitter.
Cocoa wasn’t fully mixed or you used very dark cocoa without enough sugar. Mix dry better and add a pinch more sugar. - Dry edges.
Use oil instead of butter, or add 1 teaspoon more milk.
Ingredient Deep Dive
Cocoa Powder
Cocoa is your main flavor engine. Natural cocoa is sharper and more intense; Dutch-process is smoother and darker. Both work here because baking powder provides lift regardless of cocoa acidity.
Baking Powder
Just a little gives you that cake edge instead of a brownie brick. Too much makes it taste “chemical,” so measure carefully.
Chocolate Chips or Chopped Chocolate
This is the lava. Chips melt, but chopped chocolate melts faster and more fluidly. If you want that dramatic spoon-break moment, use a chunk of chocolate bar pushed into the center.

FAQs
Can I make this without baking powder?
Yes, but the texture will be denser and more brownie-like. If you have it, use it—it helps the edges lift and stay tender.
What if I don’t have cocoa powder?
You can’t get the same flavor without cocoa. If you only have hot chocolate mix, it can work in a pinch, but it’s sweeter and less chocolatey—reduce the sugar and expect a lighter flavor.
How do I know when it’s done?
Edges set, top mostly set, center still soft. If it looks fully matte and firm across the top, it’s probably overdone for lava.
Can I double it?
You can, but don’t cook a double batch in one mug. Make two separate mugs for even cooking and a better molten center.
Why does my mug cake have a dry flour pocket?
Because dry ingredients weren’t mixed thoroughly before adding wet. Stir the dry mixture until uniform first.
Final Thoughts
Easy Chocolate Lava Mug Cake is one of those recipes you make once and then keep “in your back pocket” forever. It’s quick, cozy, and delivers that molten-center drama without baking a full dessert. Keep your cook time short, let it rest, and you’ll get a warm, gooey spoonful that feels like an instant reward.
Print
Easy Chocolate Lava Mug Cake: Gooey, Glossy, 5-Minute Magic
- Total Time: 5 minutes
- Yield: 1 mug cake 1x
- Diet: Vegetarian
Description
Easy Chocolate Lava Mug Cake is the fastest way to get a warm, gooey chocolate dessert with a molten center—made right in a microwave-safe mug.
This single-serve treat delivers bakery-style lava cake vibes with pantry staples in about 5 minutes.
Pinterest tip: Save this Easy Chocolate Lava Mug Cake for weeknight cravings, last-minute date-night dessert, or anytime you want a quick chocolate fix.
It’s rich, fudgy, and perfect topped with vanilla ice cream, whipped cream, or fresh berries.
Ingredients
- 4 tbsp all-purpose flour
- 4 tbsp granulated sugar
- 2 tbsp unsweetened cocoa powder
- 1/4 tsp baking powder
- 1 pinch fine salt
- 5 tbsp milk (dairy or plant-based)
- 2 tbsp neutral oil (or 2 tbsp melted butter)
- 1/2 tsp vanilla extract
- 2 tbsp semisweet chocolate chips (plus extra for topping)
- Optional: 1/8 tsp espresso powder
- Optional toppings: powdered sugar, ice cream, whipped cream, flaky salt
Instructions
- 1. Use a microwave-safe 12–16 oz mug to prevent overflow
- 2. Add flour, sugar, cocoa powder, baking powder, and salt to the mug and stir until evenly combined
- 3. Pour in milk, oil (or melted butter), and vanilla and stir until smooth with no dry pockets
- 4. Press chocolate chips (or a chunk of chocolate) into the center of the batter without fully mixing them in
- 5. Microwave on high for 45 seconds, then check the top for set edges and a slightly glossy center
- 6. Microwave 10–20 seconds more as needed until edges are set but the center is still soft
- 7. Let the mug cake rest for 1 minute so the lava thickens and the cake finishes setting
- 8. Top with powdered sugar, ice cream, or a pinch of flaky salt and eat warm, spooning into the molten center
Notes
- Microwave times vary by wattage; start low and add 10-second bursts to avoid overcooking
- For a more dramatic lava center, use a 1-inch chunk of chocolate bar instead of chips
- Stir dry ingredients thoroughly before adding wet to prevent bitter cocoa pockets
- Oil keeps the cake moister; butter adds richer flavor—both work well
- Resting 1 minute is key for a thick, spoonable lava rather than scalding liquid chocolate
- If the cake turns rubbery, reduce cook time next round; lava cakes should look slightly underdone
- Use a larger mug (12–16 oz) to avoid overflow and ensure even cooking
- Add 1/8 tsp espresso powder for deeper chocolate flavor without a coffee taste
- For a peanut butter core, press 1 tsp peanut butter into the center with the chocolate
- Best eaten immediately; reheating warms it but the lava will be less molten
- Prep Time: 2 minutes
- Cook Time: 1 minute 5 seconds
- Category: Dessert
- Method: Microwave
- Cuisine: American
Nutrition
- Serving Size: 1 mug cake
- Calories: 520
- Sugar: 38 g
- Sodium: 220 mg
- Fat: 24 g
- Saturated Fat: 6 g
- Unsaturated Fat: 17 g
- Trans Fat: 0 g
- Carbohydrates: 74 g
- Fiber: 4 g
- Protein: 7 g
- Cholesterol: 10 mg
Keywords: Easy Chocolate Lava Mug Cake, chocolate mug cake, lava mug cake, microwave dessert, single serve dessert, quick chocolate cake